Introduction
The leveling sensor BLTouch works like a servo and offers advantages over the PINDA sensors. It is comparatively insensitive to temperature, and the same Z offset can usually be used for all sheets. Since no metallic sheet is required, printing can also be carried out on other surfaces (glass, Pertinax etc.). This HowTo describes the installation of the BLTouch on a one-sy board under Klipper / Mainsail.
-
-
The steps can be taken to select a bracket and mount it on the Bondtech extruder 1-3 from the HowTo for Caribou duet be taken over.
-
-
-
The power plug must be removed before all work on the one-sy board!!
-
First we have to replace the brown and red cable with the three-pin connector from the BLTouch
-
New linThe three-pin connector now comes into the old PINDA slot, the (plugged) red cable pointing towards the USB socket. The fourth (lower) PIN of the socket is not used.e.
-
The two-pin cable comes right next to it, in the Y end stop. The white cable points towards the USB socket.
-
-
-
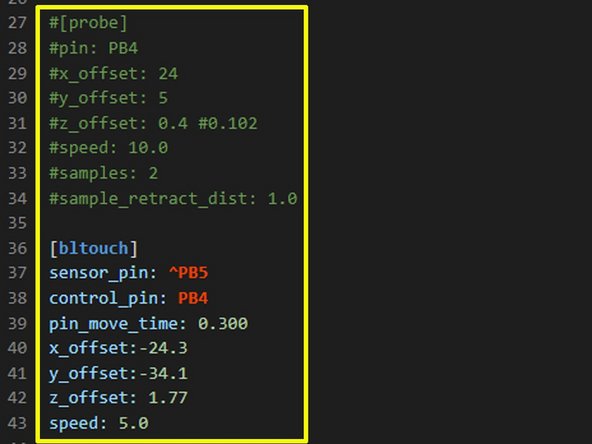
We open the file printer.cfg and deactivate lines 27 to 34 with a pound sign. In lines 36 to 43, the smoke oaks are deleted, which makes the BLTouch active.
-
Caution: The Z offset must be individually adjusted (see Step 5), otherwise the Nozzle will go into the heatbed. For safety reasons, you can first set a smaller value, e.g. between 0 and 0.5 If you use a different mount, you also have to adjust the X / Y offset.
-
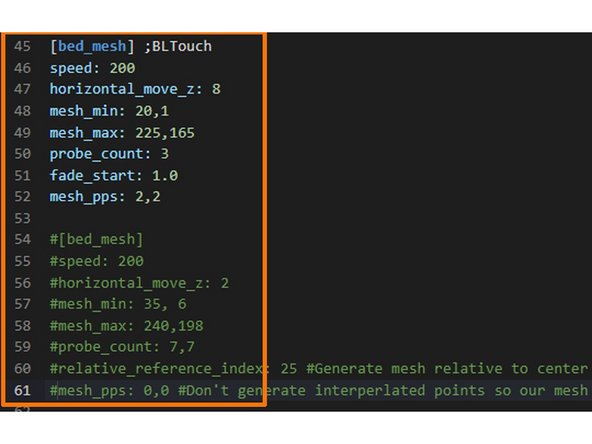
New linIn lines 45 to 52 the area [bed_mesh] activated for BLTouch by removing the pound signs and below in lines 54 to 61 the old area [bed_mesh] deactivated by pound signs.e.
-
In lines 63 to 73 the area [homing_override] deactivated by pound sign, in lines 75 to 79 the area is used for this [safe_z_home] activated by removing the diamond signs.
-
-
-
We connect the power cord and start the RaspberryPi and the printer. The BLTouch should light up in red and extend the pin twice (self-test). If this is not the case, the cabling must be checked again.
-
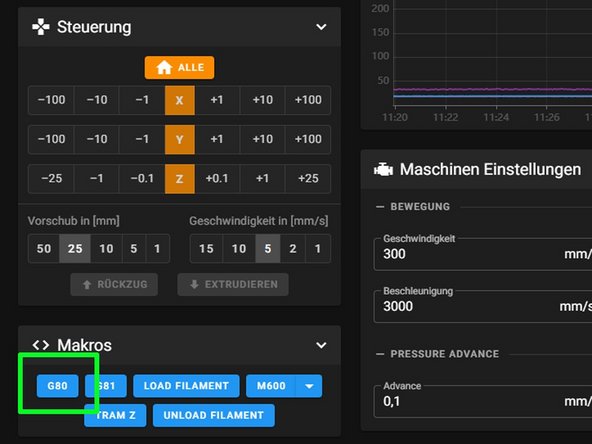
About that Macro G80 a first measurement is started.
-
-
-
The Z offset is set exactly as it is in the HowTo is described for the PINDA sensor.
-
The measuring speed is initially set to a low value and can be increased. The number of measuring points can also be increased, and the range of the measurement (grid) can also be increased. Some trial and error is required here to find ideal values.
-


![New linIn lines 45 to 52 the area [bed_mesh] activated for BLTouch by removing the pound signs and below in lines 54 to 61 the old area [bed_mesh] deactivated by pound signs.e.](https://d3t0tbmlie281e.cloudfront.net/igi/caribou3d/Q2GEUwTMJrsJGDaQ.medium)

